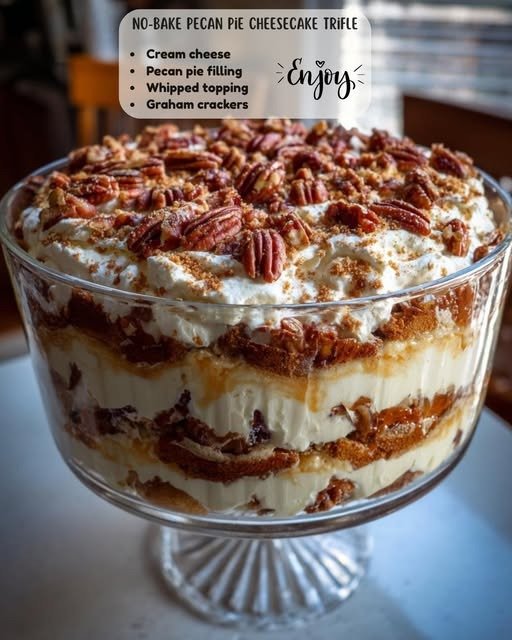
Pineapple Cream Cheese Pound Cake with Pineapple Glaze – Moist Tropical Southern Pound Cake

Introduction:
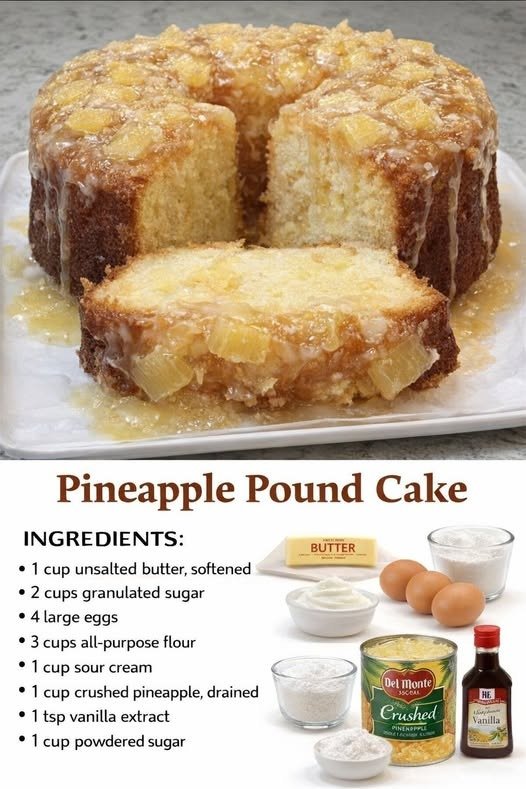
Pineapple Sour Cream Pound Cake is the perfect blend of classic Southern baking and bright tropical flavor. This cake takes the rich, velvety texture of a traditional pound cake and infuses it with crushed pineapple and tangy sour cream, creating a moist, flavorful dessert that stays fresh for days. Every slice is tender, buttery, sweet, and lightly fruity, with little bits of pineapple throughout. It’s the type of cake that gets better the day after baking, making it perfect for gatherings and celebrations.

The sour cream brings moisture and richness, while the pineapple adds natural sweetness and a refreshing tropical twist. This pound cake bakes into a beautiful golden color, develops a signature sugary crust, and fills your kitchen with the most irresistible aroma. Whether you serve it plain, glazed, or with whipped cream and fruit, this is a dessert that never fails to impress.

If you want a pound cake that’s unique but still feels comforting and familiar, Pineapple Sour Cream Pound Cake is the perfect choice. Below is your complete recipe with all the steps, variations, tips, and serving ideas you need to make this cake perfectly every time.

Ingredients:
For the Pound Cake:
3 cups all-purpose flour
3 cups granulated sugar
1 cup unsalted butter, softened
½ cup shortening (or replace with butter)
6 large eggs, room temperature
1 cup sour cream
1 can (20 oz) crushed pineapple, well-drained
1 teaspoon vanilla extract
½ teaspoon pineapple extract (optional but recommended)
½ teaspoon baking soda
½ teaspoon salt

Optional Pineapple Glaze:
1 ½ cups powdered sugar
2–3 tablespoons pineapple juice
½ teaspoon vanilla or pineapple extract
Preparation:
Step 1: Preheat and Prepare the Pan
Preheat your oven to 325°F (165°C). Grease and flour a Bundt or tube pan thoroughly. Pineapple makes the cake moist, so a well-greased pan is essential for easy release.

Step 2: Cream Butter, Shortening & Sugar
Beat the butter, shortening, and sugar together until light, fluffy, and creamy. This step is key to creating that traditional tight, tender pound-cake crumb.

Step 3: Add Eggs One at a Time
Add the eggs one at a time, mixing after each one. This creates a rich, smooth batter and ensures everything blends evenly.

Step 4: Add Sour Cream, Pineapple & Extracts
Mix in the sour cream, drained crushed pineapple, vanilla, and optional pineapple extract. The batter will smell incredibly fragrant and tropical at this stage.

Step 5: Combine Dry Ingredients
In a separate bowl, sift or whisk together the flour, baking soda, and salt. Gradually add the dry mixture to the wet mixture, mixing just until combined. Do not overmix.

Step 6: Pour Batter into Pan
Spread the thick pineapple batter evenly in your prepared Bundt pan. Tap the pan lightly on the counter to release any air bubbles.

Step 7: Bake the Cake
Bake for 75–90 minutes, or until a toothpick inserted into the center comes out clean. The top should be golden and slightly crisp.

Step 8: Cool and Add Glaze (Optional)
Allow the cake to cool in the pan for 10–12 minutes, then invert onto a cooling rack. Once fully cooled, drizzle with pineapple glaze for extra sweetness.

Variation:

Pineapple Coconut Pound Cake:
Add 1 cup sweetened shredded coconut to the batter for a tropical twist.

Pineapple Cream Cheese Pound Cake:
Replace ½ cup butter with 8 oz softened cream cheese.

Pineapple Rum Pound Cake:
Add 1 tablespoon dark rum to the batter for a Caribbean-inspired version.

Pineapple Upside-Down Pound Cake:
Place pineapple slices and cherries at the bottom of the Bundt pan before adding batter.

COOKING Note:
Drain the crushed pineapple extremely well. Too much liquid will alter the cake’s structure and cause sogginess. If needed, press pineapple through a fine strainer before adding.

Serving Suggestions:

Read more

Sweet Potato Cobbler – Old-Fashioned Southern Comfort Dessert

Introduction
There’s something soulful and nostalgic about a warm, bubbling Sweet Potato Cobbler coming out of the oven. This Southern classic is a dessert that feels like home—tender slices of sweet potato simmered in a rich, buttery, cinnamon-spiced syrup, all baked under or between a soft, comforting crust. It’s the kind of recipe that has been passed down through generations, often made for Sunday suppers, family gatherings, fall celebrations, and holiday tables.

Unlike traditional fruit cobblers, this one highlights the earthy sweetness of sweet potatoes, transforming them into a dessert that tastes like a warm hug. The combination of brown sugar, butter, spices, and vanilla creates a caramel-like sauce that coats every bite. As it bakes, the sauce thickens, the crust browns beautifully, and the kitchen fills with a smell so good it’s almost impossible to wait for it to cool.

This recipe is simple, hearty, and deeply comforting. Whether you’re new to Southern desserts or grew up eating cobbler from your grandma’s kitchen, this Sweet Potato Cobbler will bring warmth and joy to your table.

Ingredients
For the Sweet Potatoes:

3–4 medium sweet potatoes, peeled and sliced (about 4 cups)
4 cups water (for boiling)
For the Cobbler Syrup:

1 ½ cups granulated sugar
1 cup light brown sugar
1 stick (½ cup) unsalted butter
1 tsp ground cinnamon
½ tsp ground nutmeg
1 tbsp vanilla extract
1 ½ cups water (for syrup)
For the Crust:

1 ½ cups all-purpose flour
1 cup granulated sugar
2 tsp baking powder
½ tsp salt
1 ½ cups milk
½ cup melted butter
Preparation
Step 1: Prepare the Sweet Potatoes
Peel and slice the sweet potatoes into ¼-inch thick rounds. Place them in a large pot, cover with water, and bring to a boil over medium heat. Cook for about 12–15 minutes, until the potatoes are just tender but not mushy. Drain and set aside.

Step 2: Create the Spiced Syrup
In a saucepan, combine 1 cup water, granulated sugar, brown sugar, butter, cinnamon, nutmeg, and vanilla. Bring to a gentle boil, stirring until the butter melts and the sugars dissolve. Let the mixture simmer for 5 minutes to thicken slightly. Remove from heat.

Step 3: Prepare the Batter
In a large mixing bowl, whisk together flour, sugar, baking powder, and salt. Add the milk and melted butter, stirring until a smooth batter forms. It should be pourable and similar to pancake batter.

Step 4: Assemble the Cobbler
Preheat oven to 350°F (175°C). Pour the batter into a greased 9×13 baking dish—do NOT stir. Arrange the boiled sweet potato slices evenly on top of the batter. Slowly pour the warm syrup over the entire dish, letting it seep down naturally. Again, do not stir.

Step 5: Bake to Perfection
Place the cobbler into the oven and bake for 45–55 minutes, or until the top is golden brown and the edges are bubbling. The batter will rise around the sweet potatoes, creating that classic cobbler texture with a thick, caramelized sauce beneath.

Variation

Read more

Creamy Baked Broccoli with Tomatoes and Kale

Creamy Baked Broccoli with Tomatoes and Kale is a wholesome comfort dish that brings together tender broccoli, juicy cherry tomatoes, and nutrient-rich kale in a luscious, cheesy cream sauce. Baked to golden perfection, it’s the perfect balance of creamy indulgence and fresh garden flavors—ideal as a hearty side or a light vegetarian main. SAVE THIS! … Read more

Banish Flies, Mosquitoes, and Cockroaches with These Simple Natural Remedies

Dealing with pesky insects like flies, mosquitoes, and cockroaches can be frustrating, especially when they invade your home or outdoor spaces. While chemical-based repellents and pesticides are effective, many people prefer natural solutions that are safer for families, pets, and the environment. The good news is that there are plenty of simple, eco-friendly remedies to … Read more

No-Bake Mini Key Lime Pies

Introduction
No-Bake Mini Key Lime Pies are the perfect dessert when you want something light, refreshing, and impressive—without turning on the oven. Inspired by the classic Florida Key Lime Pie, these mini versions deliver the same tangy citrus flavor and creamy texture in individual servings that are ideal for parties, holidays, and summer gatherings.

What makes these mini pies truly special is their balance of flavors. The sweet, buttery graham cracker crust contrasts beautifully with the smooth, tangy lime filling. The filling itself is rich yet refreshing, made creamy with sweetened condensed milk and balanced with bright lime juice. Because these pies are no-bake, the texture stays silky and mousse-like, making each bite melt in your mouth.

These individual desserts are perfect for entertaining. They’re easy to prepare ahead of time, simple to decorate, and mess-free to serve. Whether you’re hosting a barbecue, baby shower, bridal shower, or holiday dinner, these mini key lime pies add a fresh, elegant touch to your dessert table.

Another reason these pies are so popular is their simplicity. With minimal ingredients and no baking required, even beginner cooks can achieve stunning results. Plus, their mini size means built-in portion control—though they’re so good, you may want more than one.

Ingredients

For the Crust:
1 1/2 cups graham cracker crumbs

6 tablespoons unsalted butter, melted

2 tablespoons granulated sugar

For the Filling:
1 can (14 oz) sweetened condensed milk

1/2 cup key lime juice (or fresh lime juice)

1 tablespoon lime zest

1 cup heavy whipping cream, cold

Optional Toppings:
Whipped cream

Lime slices or zest

Graham cracker crumbs

Instructions
Step 1: Prepare the Crust
In a medium bowl, combine graham cracker crumbs, melted butter, and sugar. Mix until the texture resembles wet sand.

Step 2: Form the Crusts
Press the mixture firmly into the bottoms of muffin liners or mini tart pans. Use the back of a spoon or a small glass to compact the crust evenly.

Step 3: Chill the Crust
Place crusts in the refrigerator for at least 15–20 minutes to firm up.

Step 4: Make the Lime Filling Base
In a large bowl, whisk together sweetened condensed milk, key lime juice, and lime zest until smooth and slightly thickened.

Step 5: Whip the Cream
In a separate chilled bowl, beat heavy whipping cream until stiff peaks form.

Step 6: Combine Filling
Gently fold the whipped cream into the lime mixture using a spatula. Fold slowly to keep the filling light and airy.

Step 7: Fill the Crusts
Spoon or pipe the filling evenly over the chilled crusts, smoothing the tops.

Step 8: Chill Until Set
Refrigerate mini pies for at least 3–4 hours, or until fully set.

Step 9: Garnish and Serve

Before serving, top with whipped cream, lime zest, or a thin lime slice.

Ingredients:
For the Crust:
1 1/2 cups graham cracker crumbs
6 tablespoons unsalted butter, melted
2 tablespoons granulated sugar
For the Filling:
1 can (14 oz) sweetened condensed milk
1/2 cup key lime juice (or fresh lime juice)
1 tablespoon lime zest
1 cup heavy whipping cream, cold
Optional Toppings:
Whipped cream
Lime slices or zest
Graham cracker crumbs
Preparation :

Read more

Easy Vegetable Beef Soup – Hearty, Comforting One-Pot Dinner

Introduction Easy Vegetable Beef Soup is the kind of comforting, nourishing meal that never goes out of style. It’s hearty, warm, and packed with tender beef, wholesome vegetables, and a rich, savory broth that tastes like it’s been simmering all day—without requiring complicated steps. This soup is perfect for busy weeknights, chilly evenings, or anytime … Read more

No-Bake Pecan Pie Cheesecake Trifle – Easy Layered Holiday Dessert

Introduction
If you’re looking for a show-stopping dessert that delivers all the cozy flavors of pecan pie without turning on the oven, this No-Bake Pecan Pie Cheesecake Trifle is exactly what you need. It combines the rich, nutty sweetness of classic pecan pie with the smooth, tangy creaminess of cheesecake, all layered beautifully in a trifle dish that looks as impressive as it tastes.

This dessert is perfect for holidays like Thanksgiving, Christmas, and New Year’s, but it’s also easy enough to make for potlucks, family gatherings, or when you simply want a decadent treat without baking. The no-bake method makes it stress-free, while the layered presentation makes it feel elegant and indulgent.

Each spoonful delivers creamy cheesecake filling, buttery graham cracker or cake layers, and a glossy pecan topping kissed with caramel flavor. The textures are perfectly balanced—smooth, crunchy, and melt-in-your-mouth—all in one bite. Best of all, this trifle can be made ahead of time, making it ideal for busy schedules.

Ingredients
For the Cheesecake Layer
16 oz (450 g) cream cheese, softened
1 cup powdered sugar
2 teaspoons vanilla extract
1 ½ cups heavy whipping cream, cold
For the Pecan Pie Layer
2 cups chopped pecans
1 cup pecan pie filling or caramel sauce
2 tablespoons brown sugar
2 tablespoons unsalted butter, melted
½ teaspoon cinnamon (optional)
For the Base Layers
2 cups graham cracker crumbs, vanilla wafers, or cubed pound cake
3 tablespoons melted butter (if using crumbs)
Optional Toppings
Whipped cream
Whole pecans
Caramel drizzle
Preparation
Step 1: Prepare the Cheesecake Filling
In a large mixing bowl, beat the softened cream cheese until smooth and creamy with no lumps. Add the powdered sugar and vanilla extract, and beat again until fully combined and silky.

In a separate chilled bowl, whip the cold heavy cream until stiff peaks form. Gently fold the whipped cream into the cream cheese mixture using a spatula. Fold slowly to keep the filling light and airy. Set aside.

Step 2: Prepare the Pecan Pie Mixture
In a medium bowl, combine chopped pecans, pecan pie filling or caramel sauce, brown sugar, melted butter, and cinnamon if using. Stir until the pecans are evenly coated and glossy. This mixture should resemble a thick, sticky pecan pie topping.

Step 3: Prepare the Base Layer
If using graham cracker crumbs, mix them with melted butter until evenly moistened. If using vanilla wafers or pound cake, simply cube or crush them slightly for texture.

Step 4: Assemble the Trifle
In a trifle dish or large glass bowl, start with a layer of graham crumbs or cake. Spoon a generous layer of cheesecake filling over the base and smooth it gently. Add a layer of the pecan pie mixture, spreading it evenly.

Repeat the layers—base, cheesecake, pecan topping—until all ingredients are used, finishing with a cheesecake or pecan layer on top depending on your preference.

Step 5: Chill and Set
Cover the trifle with plastic wrap and refrigerate for at least 4 hours, preferably overnight. This allows the flavors to meld and the layers to set beautifully.

Variation
Chocolate Pecan Trifle: Add chocolate chips or drizzle chocolate sauce between layers.
Pumpkin Pecan Cheesecake Trifle: Fold pumpkin purée and pumpkin spice into the cheesecake layer.
Bourbon Pecan Version: Add 1–2 teaspoons of bourbon to the pecan mixture for a deep, grown-up flavor.
Mini Trifles: Assemble in individual cups or jars for parties and portion control.
Cooking Note
Even though this is a no-bake dessert, temperature matters. Always use cold whipped cream and softened cream cheese for the smoothest texture. Chilling time is essential—rushing this step can cause loose layers and less defined slices.

Serving Suggestions

Read more

Southern Caramel Pound Cake

Introduction A true Southern classic, the Southern Caramel Pound Cake is rich, buttery, dense, and topped with a silky caramel icing that melts right into the warm cake. This dessert has deep roots in Southern kitchens, where caramel cake has long been a centerpiece for Sunday dinners, celebrations, holidays, and potlucks. Its slow-cooked caramel icing … Read more

Salisbury Steak with Onion Gravy

Why Salisbury Steak with Onion Gravy Remains a Timeless Favorite Salisbury steak has endured for generations because it combines affordable ingredients, ease of preparation, and robust flavor. The marriage of seasoned ground beef and slow-cooked onion gravy creates a meal that is both economical and deeply satisfying. When prepared correctly, the result is juicy beef … Read more