Crab and Shrimp Seafood Bisque

Crab and Shrimp Seafood Bisque is a luxurious dish that combines the delicate flavors of crab and shrimp in a creamy, velvety broth. This rich and indulgent bisque is perfect for a special occasion or when you want to treat yourself to something truly exceptional. Ingredients 3 tablespoons butter 2 tablespoons chopped green onion 2 … Read more

Sweet Potato Pie – Full Detailed Recipe

Introduction
Sweet Potato Pie is a timeless Southern dessert that brings warmth, comfort, and nostalgia to every bite. With its silky texture, buttery crust, and fragrant blend of cinnamon, nutmeg, and vanilla, this pie has become a staple on Thanksgiving tables, Sunday dinners, potlucks, and celebrations across generations.

Unlike pumpkin pie, Sweet Potato Pie has a naturally richer flavor—earthy, sweet, and deeply satisfying. When baked properly, it’s smooth and custard-like, with a golden top and a flavor profile that feels like home. This recipe delivers the perfect balance of sweetness and spice while letting the natural taste of sweet potatoes shine through.

Whether you’re preparing it for the holidays or simply craving a slice of Southern comfort, this detailed guide will walk you through the best version of this classic dessert—complete with variations, tips, and serving suggestions to guarantee success every time.

Table of Contents
Introduction
Ingredients:
For the Pie Filling:
Preparation :
Step 1: Prepare the Sweet Potatoes
Step 2: Mix the Wet Ingredients
Step 3: Combine the Filling
Step 4: Prepare the Pie Crust
Step 5: Fill and Bake
Variation
1. Brown Sugar Sweet Potato Pie
2. Sweet Potato Pie with Pecans
3. Spiced Sweet Potato Pie
4. Marshmallow Sweet Potato Pie
5. Coconut Sweet Potato Pie
COOKING Note :
Serving Suggestions :
Tips :
Prep Time:
Cooking Time:
Total Time:
Nutritional Information : (Approx. per slice, 8 slices total)
FAQs
1. Can I make Sweet Potato Pie ahead of time?
2. Can I freeze Sweet Potato Pie?
3. Why did my pie crack on top?
4. Can I use canned sweet potatoes?
5. Should I blind-bake the crust?
Conclusion

Ingredients:
For the Pie Filling:
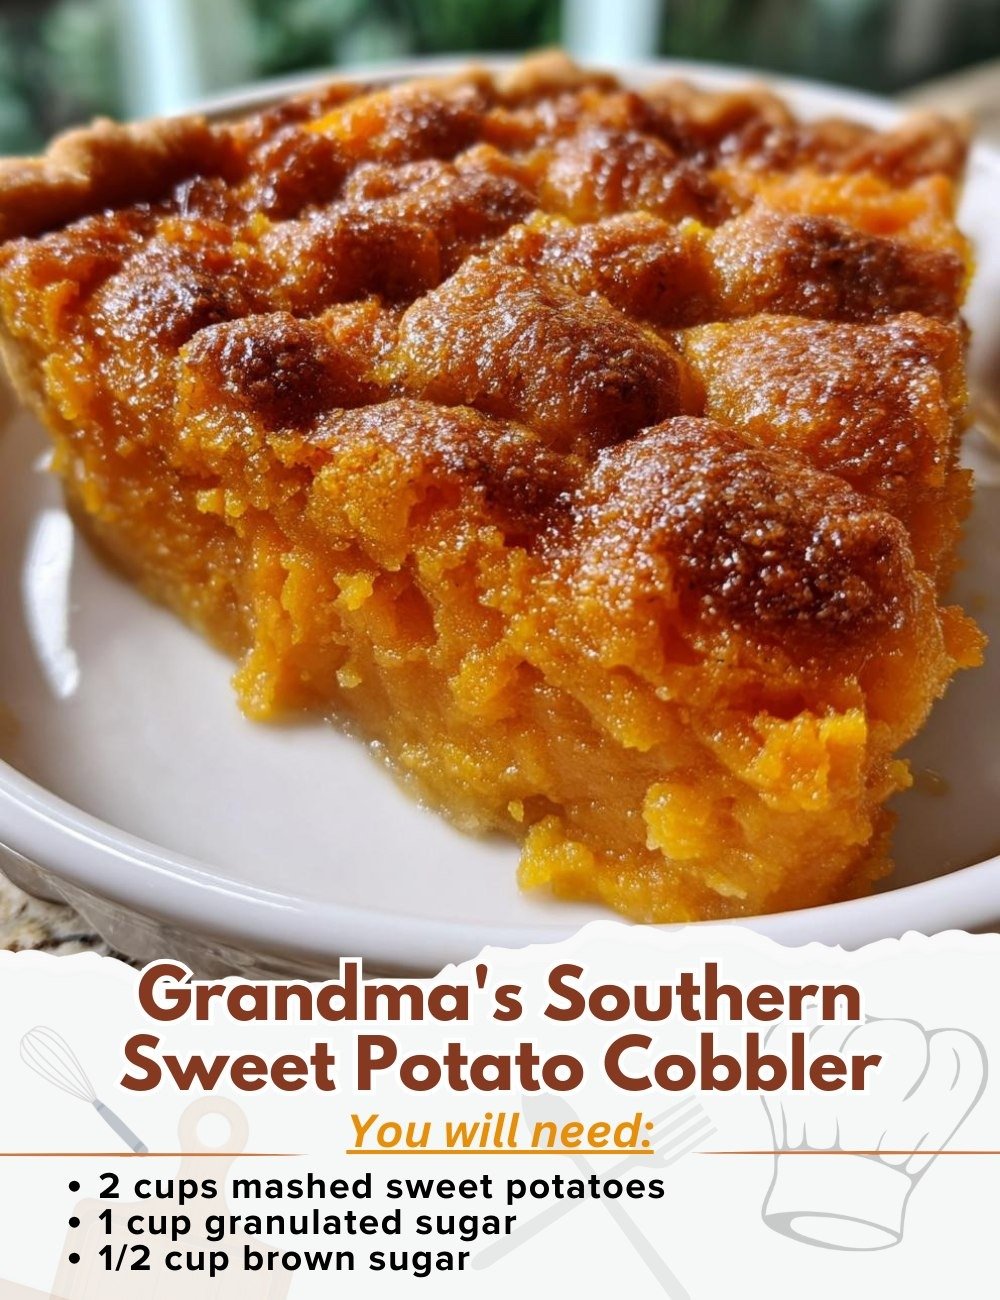
2 cups mashed sweet potatoes (about 2–3 large sweet potatoes)
1 cup granulated sugar
1/2 cup evaporated milk
2 large eggs
1/4 cup unsalted butter, melted
1 teaspoon vanilla extract
1 teaspoon ground cinnamon
1/2 teaspoon ground nutmeg
1/4 teaspoon salt
1 unbaked 9-inch pie crust (store-bought or homemade)
Preparation :
Step 1: Prepare the Sweet Potatoes
Wash the sweet potatoes well, then place them in a pot and cover with water. Boil for 40–45 minutes until completely tender. Alternatively, you can bake them at 400°F (200°C) for 1 hour to enhance sweetness. Once soft, let them cool slightly, peel the skin, and mash until smooth and lump-free.

Step 2: Mix the Wet Ingredients
In a large mixing bowl, combine the melted butter, evaporated milk, eggs, and vanilla extract. Whisk until smooth and fully incorporated. These ingredients create the creamy custard-like texture that makes Sweet Potato Pie special.

Step 3: Combine the Filling
Add the mashed sweet potatoes into the wet mixture. Sprinkle in the sugar, cinnamon, nutmeg, and salt. Whisk—or use a hand mixer—until the filling becomes velvety, glossy, and completely smooth. The mixture should be pourable but slightly thick.

Step 4: Prepare the Pie Crust
Place your unbaked pie crust in a 9-inch pie pan. Crimp the edges for decoration if desired. Lightly prick the bottom of the crust with a fork to prevent bubbling.

Step 5: Fill and Bake
Pour the sweet potato mixture into the pie crust and smooth the top with a spatula. Bake at 350°F (175°C) for 55–60 minutes or until the center is mostly set and only slightly jiggles. Remove from the oven and let it cool completely to firm up.

Variation

Read more

Put raw shrimp in a slow cooker with these 3 ingredients. It’s seafood heaven.

Garlic Shrimp Pasta is a delightful dish that combines the rich flavors of garlic and shrimp with the comforting texture of pasta. This slow cooker version simplifies the process, allowing the flavors to meld beautifully over time. Originating from Italian cuisine, this dish is perfect for those who appreciate the simplicity and elegance of Mediterranean … Read more

Banana Pudding Layered Dessert – A Southern Classic with a Creamy Twist

Table of Contents
Why You’ll Love This Banana Pudding Layered Dessert
Ingredients You’ll Need
For the pudding layer:
For the cream cheese layer:
For the whipped cream:
Additional layers:
Step-by-Step Instructions
1. Prepare the Pudding
2. Make the Cream Cheese Filling
3. Whip the Cream
4. Assemble the Layers
5. Chill and Serve
Tips for Success
Variations and Substitutions
Make-Ahead & Storage Tips
Serving Suggestions
FAQs
Conclusion
There are some desserts that don’t just taste good—they feel like home. My grandmother’s banana pudding was exactly that: a dish reserved for Sunday suppers, potlucks, and every family gathering under the Southern sun. This Banana Pudding Layered Dessert is inspired by her recipe but elevated with extra creamy layers, a touch more indulgence, and just enough modern flair to make it a showstopper at any summer celebration.

Why You’ll Love This Banana Pudding Layered Dessert
This Banana Pudding Layered Dessert is everything a summer treat should be: cool, creamy, sweet, and utterly satisfying. Made with layers of rich vanilla pudding, fresh bananas, whipped cream, and classic Nilla Wafers, it’s simple to prepare yet decadent enough to impress guests. Here’s what makes it special:

No baking required – Perfect for warm days when you want to avoid the oven.
Layered for beauty and flavor – Each spoonful delivers a bit of every creamy, crunchy component.
Classic Southern charm – Comforting, nostalgic, and crowd-pleasing.
Easily made ahead – Ideal for picnics, barbecues, or weekend brunches.
Ingredients You’ll Need
This layered banana pudding dessert uses pantry staples and fresh ingredients to create something truly special.

For the pudding layer:
1 (5.1 oz) package instant vanilla pudding mix
2 ¾ cups cold whole milk
For the cream cheese layer:
1 (8 oz) package cream cheese, softened
1 (14 oz) can sweetened condensed milk
1 teaspoon pure vanilla extract
For the whipped cream:
2 cups heavy whipping cream
3 tablespoons powdered sugar
½ teaspoon vanilla extract
Additional layers:
1 box Nilla Wafers (about 11 oz)
4–5 ripe bananas, sliced
Optional: crushed Nilla Wafers and banana slices for garnish
Step-by-Step Instructions
1. Prepare the Pudding
In a large bowl, whisk together the vanilla pudding mix and cold milk for about 2 minutes until it begins to thicken. Set aside in the fridge for 10 minutes to fully set.

2. Make the Cream Cheese Filling
In a medium mixing bowl, beat the softened cream cheese until smooth and fluffy. Add the sweetened condensed milk and vanilla extract, beating until fully combined and silky. Fold the prepared vanilla pudding into the cream cheese mixture. Set aside.

3. Whip the Cream
In a chilled bowl, beat the heavy cream with powdered sugar and vanilla until soft peaks form. Reserve half for topping the dessert, and fold the other half gently into the pudding mixture for added lightness.

4. Assemble the Layers
In a 9×13-inch glass dish or trifle bowl, begin layering:

A base of Nilla Wafers
A layer of banana slices
A generous layer of the pudding-cream cheese mixture
Repeat these layers until all ingredients are used, finishing with a layer of whipped cream on top. Garnish with crushed Nilla Wafers and extra banana slices if desired.

5. Chill and Serve
Refrigerate for at least 4 hours (or overnight) to allow the flavors to meld and the dessert to firm up. Serve chilled with a big spoon and a smile.

Tips for Success
Use ripe but firm bananas for the best flavor and texture.
Chill the mixing bowl and beaters before whipping the cream for optimal volume.
For a touch of extra flavor, add a layer of caramel sauce or a sprinkle of cinnamon.
Want a lighter version? Substitute light cream cheese and whipped topping (like Cool Whip).
Variations and Substitutions
Chocolate Lovers: Add a thin layer of chocolate ganache or chocolate pudding between the vanilla layers.
Boozy Twist: Add a splash of banana liqueur or bourbon to the pudding mixture (adults only!).
Different Cookies: Try graham crackers, shortbread, or even Biscoff cookies in place of Nilla Wafers.
Vegan Option: Use plant-based milk, dairy-free pudding mix, vegan cream cheese, and coconut whipped cream.
Make-Ahead & Storage Tips
This banana pudding dessert actually gets better with time, making it a dream for entertaining.

Make-ahead: Prepare the full dessert up to 24 hours in advance and store in the fridge.
Leftovers: Keep covered and refrigerated for up to 3 days. Note: bananas may darken slightly, but the flavor remains delightful.
Freezing: Not recommended, as the texture of bananas and cream may change.
Serving Suggestions
Serve this Banana Pudding Layered Dessert at:

Summer BBQs
Bridal or baby showers
Fourth of July celebrations
Sunday dinners
Potlucks and picnics
For a charming presentation, try assembling individual servings in mason jars or dessert glasses.

FAQs
Can I use homemade pudding instead of instant?
Absolutely! Just make sure it’s fully chilled and thickened before folding into the cream cheese mixture.

How do I prevent the bananas from turning brown?
Toss banana slices in a bit of lemon juice before layering to slow oxidation.

Can I use store-bought whipped topping?
Yes! Use about 3–4 cups of Cool Whip if you’re short on time.

Conclusion
This Banana Pudding Layered Dessert is more than just a recipe—it’s a taste of Southern hospitality, nostalgia, and sunshine all in one dish. Whether you’re bringing it to a potluck or serving it after a casual dinner on the porch, this dessert never fails to impress.

So go ahead, whip it up, chill it down, and get ready for the compliments to roll in. If you try this recipe, I’d love to hear how it turned out—leave a comment below or tag me on Instagram with your layered creations!

Ingredients

Read more

Snoop Dogg’s Easy Meatloaf

Ingredients (Serves 4–6) 1 ½ lbs (700 g) ground beef 1/2 lb (225 g) ground pork (optional, for extra juiciness) 1 cup breadcrumbs (plain or seasoned) 1/2 cup milk 1 small onion, finely chopped 2 garlic cloves, minced 1 large egg 1 tsp salt 1/2 tsp black pepper 1 tsp Worcestershire sauce 1/2 cup ketchup … Read more

T he Quiet Power of Nature: Herbs That Walk Beside Us in Balance and Grace

In a world that races toward quick fixes and synthetic solutions, there’s a gentle rebellion growing in kitchen windowsills and backyard gardens. It’s the return to something ancient: the quiet understanding that plants have walked beside humanity for thousands of years—not as miracle workers, but as faithful companions in the art of living well. That … Read more

Pineapple Cream Cheese Pound Cake with Pineapple Glaze – Moist Tropical Southern Pound Cake

Introduction:
Pineapple Sour Cream Pound Cake is the perfect blend of classic Southern baking and bright tropical flavor. This cake takes the rich, velvety texture of a traditional pound cake and infuses it with crushed pineapple and tangy sour cream, creating a moist, flavorful dessert that stays fresh for days. Every slice is tender, buttery, sweet, and lightly fruity, with little bits of pineapple throughout. It’s the type of cake that gets better the day after baking, making it perfect for gatherings and celebrations.

The sour cream brings moisture and richness, while the pineapple adds natural sweetness and a refreshing tropical twist. This pound cake bakes into a beautiful golden color, develops a signature sugary crust, and fills your kitchen with the most irresistible aroma. Whether you serve it plain, glazed, or with whipped cream and fruit, this is a dessert that never fails to impress.

If you want a pound cake that’s unique but still feels comforting and familiar, Pineapple Sour Cream Pound Cake is the perfect choice. Below is your complete recipe with all the steps, variations, tips, and serving ideas you need to make this cake perfectly every time.

Ingredients:
For the Pound Cake:
3 cups all-purpose flour
3 cups granulated sugar
1 cup unsalted butter, softened
½ cup shortening (or replace with butter)
6 large eggs, room temperature
1 cup sour cream
1 can (20 oz) crushed pineapple, well-drained
1 teaspoon vanilla extract
½ teaspoon pineapple extract (optional but recommended)
½ teaspoon baking soda
½ teaspoon salt

Optional Pineapple Glaze:
1 ½ cups powdered sugar
2–3 tablespoons pineapple juice
½ teaspoon vanilla or pineapple extract
Preparation:
Step 1: Preheat and Prepare the Pan
Preheat your oven to 325°F (165°C). Grease and flour a Bundt or tube pan thoroughly. Pineapple makes the cake moist, so a well-greased pan is essential for easy release.

Step 2: Cream Butter, Shortening & Sugar
Beat the butter, shortening, and sugar together until light, fluffy, and creamy. This step is key to creating that traditional tight, tender pound-cake crumb.

Step 3: Add Eggs One at a Time
Add the eggs one at a time, mixing after each one. This creates a rich, smooth batter and ensures everything blends evenly.

Step 4: Add Sour Cream, Pineapple & Extracts
Mix in the sour cream, drained crushed pineapple, vanilla, and optional pineapple extract. The batter will smell incredibly fragrant and tropical at this stage.

Step 5: Combine Dry Ingredients
In a separate bowl, sift or whisk together the flour, baking soda, and salt. Gradually add the dry mixture to the wet mixture, mixing just until combined. Do not overmix.

Step 6: Pour Batter into Pan
Spread the thick pineapple batter evenly in your prepared Bundt pan. Tap the pan lightly on the counter to release any air bubbles.

Step 7: Bake the Cake
Bake for 75–90 minutes, or until a toothpick inserted into the center comes out clean. The top should be golden and slightly crisp.

Step 8: Cool and Add Glaze (Optional)
Allow the cake to cool in the pan for 10–12 minutes, then invert onto a cooling rack. Once fully cooled, drizzle with pineapple glaze for extra sweetness.

Variation:

Pineapple Coconut Pound Cake:
Add 1 cup sweetened shredded coconut to the batter for a tropical twist.

Pineapple Cream Cheese Pound Cake:
Replace ½ cup butter with 8 oz softened cream cheese.

Pineapple Rum Pound Cake:
Add 1 tablespoon dark rum to the batter for a Caribbean-inspired version.

Pineapple Upside-Down Pound Cake:
Place pineapple slices and cherries at the bottom of the Bundt pan before adding batter.

COOKING Note:
Drain the crushed pineapple extremely well. Too much liquid will alter the cake’s structure and cause sogginess. If needed, press pineapple through a fine strainer before adding.

Serving Suggestions:

Read more

Sweet Potato Cobbler – Old-Fashioned Southern Comfort Dessert

Introduction
There’s something soulful and nostalgic about a warm, bubbling Sweet Potato Cobbler coming out of the oven. This Southern classic is a dessert that feels like home—tender slices of sweet potato simmered in a rich, buttery, cinnamon-spiced syrup, all baked under or between a soft, comforting crust. It’s the kind of recipe that has been passed down through generations, often made for Sunday suppers, family gatherings, fall celebrations, and holiday tables.

Unlike traditional fruit cobblers, this one highlights the earthy sweetness of sweet potatoes, transforming them into a dessert that tastes like a warm hug. The combination of brown sugar, butter, spices, and vanilla creates a caramel-like sauce that coats every bite. As it bakes, the sauce thickens, the crust browns beautifully, and the kitchen fills with a smell so good it’s almost impossible to wait for it to cool.

This recipe is simple, hearty, and deeply comforting. Whether you’re new to Southern desserts or grew up eating cobbler from your grandma’s kitchen, this Sweet Potato Cobbler will bring warmth and joy to your table.

Ingredients
For the Sweet Potatoes:

3–4 medium sweet potatoes, peeled and sliced (about 4 cups)
4 cups water (for boiling)
For the Cobbler Syrup:

1 ½ cups granulated sugar
1 cup light brown sugar
1 stick (½ cup) unsalted butter
1 tsp ground cinnamon
½ tsp ground nutmeg
1 tbsp vanilla extract
1 ½ cups water (for syrup)
For the Crust:

1 ½ cups all-purpose flour
1 cup granulated sugar
2 tsp baking powder
½ tsp salt
1 ½ cups milk
½ cup melted butter
Preparation
Step 1: Prepare the Sweet Potatoes
Peel and slice the sweet potatoes into ¼-inch thick rounds. Place them in a large pot, cover with water, and bring to a boil over medium heat. Cook for about 12–15 minutes, until the potatoes are just tender but not mushy. Drain and set aside.

Step 2: Create the Spiced Syrup
In a saucepan, combine 1 cup water, granulated sugar, brown sugar, butter, cinnamon, nutmeg, and vanilla. Bring to a gentle boil, stirring until the butter melts and the sugars dissolve. Let the mixture simmer for 5 minutes to thicken slightly. Remove from heat.

Step 3: Prepare the Batter
In a large mixing bowl, whisk together flour, sugar, baking powder, and salt. Add the milk and melted butter, stirring until a smooth batter forms. It should be pourable and similar to pancake batter.

Step 4: Assemble the Cobbler
Preheat oven to 350°F (175°C). Pour the batter into a greased 9×13 baking dish—do NOT stir. Arrange the boiled sweet potato slices evenly on top of the batter. Slowly pour the warm syrup over the entire dish, letting it seep down naturally. Again, do not stir.

Step 5: Bake to Perfection
Place the cobbler into the oven and bake for 45–55 minutes, or until the top is golden brown and the edges are bubbling. The batter will rise around the sweet potatoes, creating that classic cobbler texture with a thick, caramelized sauce beneath.

Variation

Read more

Creamy Baked Broccoli with Tomatoes and Kale

Creamy Baked Broccoli with Tomatoes and Kale is a wholesome comfort dish that brings together tender broccoli, juicy cherry tomatoes, and nutrient-rich kale in a luscious, cheesy cream sauce. Baked to golden perfection, it’s the perfect balance of creamy indulgence and fresh garden flavors—ideal as a hearty side or a light vegetarian main. SAVE THIS! … Read more